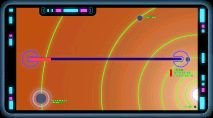
Pause the game and enter the Sensors Manager. Pan to the enemy
encampment
There you will see (thanks to your Sensors Array) the (black) (E)MS. In
front of it are 3x(E)HC's (black). In front of them is 1x(E)HC (gray) with
some escorts; you are soon to meet them. To the (E)MS's left a (black)
(E)Cruiser is moving away from the (E)MS toward the asteroid stream to
act as a RCn. To the (E)MS's far right is a red dot which is a (E)Sensors
Array. I guess the one to the far left is also; it's too far off the map
to see
In the gap between the MS's a string of red dots will soon be looping.
They are (E)PS's. Don't ask me what they're there for - you can
easily bypass them and anyway there is no need to use cloaking in
this level
[A] is a (black) (E)Cruiser which starts decending on your MS as soon as
the level loads. It ejects a bunch of (E)AB's and some (E)MGC's and then
disappears off [AR]
The group of red dots [U] are a bunch of bloodthirsty (black) (E)IF's
coming for your MS
[BAL] is a lone red dot. It is a (E)Fighter and can be taken out with two
Interceptors if you can really be bothered. Leave it there for now, though,
for it is a handy marker to show you where some enemies will soon HS in at
Fleet Intel's moving speech regarding Karan is quite touching, I thought.
Concise and to the point, but a tremor of emotion, none the less
You'll want to get your ships moving right from the word Go, so reload
the Autosave [16 - HIIGARA]
Pause the game
Keep your SCr Docked
When your Sensors Array has emerged from the MS, tell it to move
[R] quite far. Otherwise it will be killed by (E)AB's. But don't
wait until it emerges; get on with moving your other ships around
Set all ships to Evasive
Move your MD's [A]
Select all the SF's and command them to Support the MS
Put the IAF's into Wall and tell them to move to under the left-hand
SpaceGas column
Put the MBF's into Sphere and move them to the same place
Move any CFG's and GWG's there too. These ships otherwise just clutter
up the space around your MS, block your lines of fire, waste CPU cycles,
cause collisions, don't do anything useful
Move your Carrier(s) [L] and slightly [A]. It shouldn't get in the way
of the MD's. Launch your SC's
Move any IF's and AF's to intercept the (E)IF's rising under your MS. A
couple of D's would help too
Move your HC's and D's [F] and just below the center of your MS
Move a RCn to the SpaceGas column [R]; one to the column [L]; the rest
to the band in front of the (E)MS. Move most of your RC's to the band
in front of the (E)MS and only give one to each column on your side
Unpause the game. Fleet Intel will give you the first mission briefing
cutscene
Watch the Sensors Manager and you'll see the (E)Carrier descending; the
(E)IF's ascending; the gray (E)HC HSing and its escort HSing in dribs
and drabs around it
Set your IF's and AF's on the (E)IF's once they are firmly attacking
your MS (so that they won't re-target on your Frigates)
Set your D's and HC's to burn the smaller new arrivals. Try to just
target the line of 6x(E)AF's and 6x(E)IF's
The (E)Carrier will start to eject (E)AB's (which target your Sensors
Array) so set three of your MD's onto the (E)AB's. (You will have to
keep re-targetting them as they kill their targets.) But AB's pop
easily so it shouldn't be much of a problem to take them all down
Set SC's on the new arrivals thus: 3xSC's for each of the 2x(E)MD's;
3xSC's for each of the 2x(E)D's; 5xSC's for the (E)HC. The enemy will
be busy shooting your MS (and taking a few shots at your HC's and D's)
so won't attack your SC's until its too late for them (as long as you
secure them all at the same time)
The (E)Carrier will start to eject (E)MGC's (which target your MD's)
so set your other MD's onto them (since they haven't been shooting
yet, they will still have their suppply of 32 missiles so can shoot
fast)
Once the (E)Carrier has finished shedding (E)SCr, it will start to
move away. Rescue it and Retire it
Set your RC's to Harvest their respective areas
Eject some MGC's (or Interceptors if you still have some) and set
them to burn the band of (E)PS's circulating between your MS and the
(E)MS
Fleet Intel will let you know that another merry band of enemies
has emerged from HS [BLA] right next to the 'Enemy Fighter' that
sits up there. Wait for them to arrive
While you're waiting, re-assign your Control Groups to include your
newly aquired ships. Ensure they are all Evasive
Repeat the previous encounter, but this time [B]. A slight variation
is that there are 4x(E)D's instead of 2x(E)D's + 2x(E)MD's
Fleet Intel will let you know that another group of (E)CSp's is HSing
in [LU]
Continue the battle but try to free up your SC's as soon as possible.
Dock them with SF's (conveniently close by)
Repeat the previous encounter, but this time the slight variation is
that Captain Elson HSes in [A] with a small band of (A)MD's, (A)IF's
and (A)AF's
Fleet Intel assumes the worst so the (A) ships appear on the 'map' as
(E) and Fleet Intel calmly informs you that we're being overwhelmed.
After Captain Elson gives his little announcement of their epic
journey to come so far to your aid, the new ships are (A). He
generously even gives you a few MD's, AF's and IF's
You want to make sure that everything you want to rescue has been
secured by the time the (A) ships become active. Otherwise they will
target the largest enemy they can see, regardless of whether you have
it secured or not. Secured (E) vessles, however, do not attrack their
interest
(I was surprised to find that a pair of SC's had dumped an (E)AF as
high up the side of my MS as the bridge and then left it. My IF's
would not shoot it and my SC's wouldn't touch it. Fortunately, the
(A)CSp's decided to target it while I scurried around rescuing the
large (E)CSp's. The (A) only managed to hit my MS which suffered no
damage because of the 20xSF's in support of it. Eventually the (E)AF
reached the [L] portal and made its way in to conversion, whereapon
the (A)CSp's went into Phase II...)
Once there are no (E)CSp's actively attacking any of your ships any
longer, Captain Elson will lead his little force away to kill the
closest and largest (E)CSp; the (E)Carrier. (NB: if you want to
rescue this (E)Carrier, you will have to have secured it before the
(A)CSp's retarget)
If you leave them to it, the (A)CSp's will burn the (E)Carrier and
then move toward the (E)MS where they will meet their demise. This
is what I did. They don't take any other ships with them of worth
Otherwise you could go along with them, and share the glory with a
defector...
Finish off the refitting of your new ships. Reassign your Control
Groups, retreive the RC's and RCn's that have finished and
generally make everything ready for The End
Move your D's and HC's [F] with 2xSF's in tow. Also send your SC's,
your Carrier and some Interceptors for bait
Some (E)SCr will swarm your D's and HC's for a bit but your D's will
make short work of them. (A MD could be useful here; I just left them
[A] where they'd last been fighting.) Set your SF to repair any
damaged D's or HC's
If one (E)HC is moving toward your force, get your SC's ready to
take it out. It will target one or another of the D's or HC's
(whichever is closer) so set the SF's repairing it while you rescue
the (E)HC. As it is moved off toward the MS, its 3x(E)SF's will tag
along unhappily. Rescue them from their misery to your local Carrier
Otherwise, send your wing of Interceptors to tease it out of hiding
and then execute the above step
Do likewise for the other 2x(E)HC's each with 3x(E)SF's in tow
Just for the sake of it, send 2xSC's to the [FL] corner of the map
and get them to rescue the (E)Sensors Array. They will keep turning
away because they don't like driving outside the extents of the map
but if you keep retargetting them (at roughly 4Hz) you ought to be
able to grab it
Since you will now have 9xSF's in Military Parade with your Carrier,
set each one to Support a single SC. Then get six of these 'immortal'
SC's to make their way forward to the 2x(E)MD's and capture them
Grab the (E)GWG while you're at it
If you steal the 5x(E)RC's, more are made. You can just sit there,
ferrying (E)RC's between your Carrier and the (E)MS if you like.
Retire all the RC's and RCn's you have if you like (once you have
taken all the RU's on the map) - they'll be useless where you're
headed!!
Once you grow tired of converting the enemy's ships into your money,
set your local offensive CSp's to blast the (E)MS
The (E)MS will spurt out some (E)MGC's but they are too little, too
late to save the (E)MS... by a long way!
Select all the SF's and command them to Support the MS
Move your MBF's to just below the (E)MS. If you want to
be able to select them as a group easily, set them to
Wall but then they waste a bit of time manouvering into
position before they get going
If you adamantly retained the 150 IF's, they can
be of use here. Send them with or instead of your MBF's
Enemies will come and not go. They shall beset your MS
all abouts and there shall be much beaming and flashing
of teeth. But your MS will not be moved; yay! For it is
set upon a solid vacuum. From all sides shall your
enemies strike. Yay they will smite thee in the hinder
regions and enflame thine portals but still they shall
not prevail. For at least twenty polygons are continually
spewing green stuff all over you
When your MBF's are below where you thought the (E)MS
was before you lost your Sensors Array, get them to move
upward. Try to break up the formation a bit because the
enemy CSp's will start to shoot at them and if they are
in tight formation it is likely some of them will die
from collisions. As if that matters at this stage
All you need is about 10 of the 19 MBF's to get past the
(E)CSp's and start firing on the (E)MS. It will soon grow
those wonderfully detailed and perfectly hexagonal clouds
of smoke you are by now so familiar with that herald the
oncoming demise of a spaceship
By the time you're burning the (E)MS, there ought to be
quite an enemy force around your MS: 2x(E)HC, 6x(E)D,
2x(E)MD, 10x(E)AF, 16x(E)IF, (E)AB's and (E)MGC's. You
may have lost a few of the weaker CSp's from collisions
but otherwise everything will still be there and your MS
ought to be on no less than 90% health
Once the (E)MS pops, you get a second where you can re-target on the
(E)SCr
The Bentusi arrive, claiming they have brought The Council. Lots of
HS windows open and close around them but no other ships arrive other
than the MegaShip (interestingly, you can capture this ship)
So, the Council recognized our claim to this world? I'm not
surprised! Who's going to stand up against my fleet and tell
me "no" to anything I ask? I mean, having gone from satelite
technology to Hyperspace generators small enough to fit inside
a CFG in 160 years is pretty impressive for starters. And then
to march through the galaxy, reducing every enemy set against
me to smoking ruins, devestating the empire of the rulers of
the universe is pretty good too. It hardly comes as a surprise
that the Council offers no resistance whatsoever to our demand
to seize the planet. After all, the old rulers burned our
planet (killing who knows however many of our people who were
not fortunate enough to be frozen in cryogenic tanks) so now
it's our turn to repay the favor and take their planet as a
replacement.
Enjoy the closing movies and wonder at Fleet Intel's sudden change
of heart - from efficiently bloodthirsty to sickeningly remorseful.
Mayhap Karan's close shave really brought it home to him how
important Life and Love really are... even to an Intelligence